Storyline 360: Best Practices for High Quality Images and Videos
Article Last Updated
This article applies to:
For the highest quality media in your Storyline 360 courses:
- Use Images and Videos That Don't Need to Be Resized
- Adjust the Compression Settings in Storyline 360
- Lock the Storyline 360 Player at Optimal Size
Use Images and Videos That Don't Need to Be Resized
Start with high-quality images and videos that are already properly sized for your course. Scaling media up or down in your course can cause blurriness, especially if your images and videos have text.
Best Practice: Don't shrink or stretch media in your course.
If images and videos are bigger than your slides, they'll automatically be scaled down to fit, which can result in a loss of quality. Here are some tips for working with large images and videos:
|
Images |
Videos |
|
|
If you make small images and videos larger than their original sizes, they may become fuzzy. Here are some tips for working with small images and videos:
|
Images |
Videos |
|
|
Adjust the Compression Settings in Storyline 360
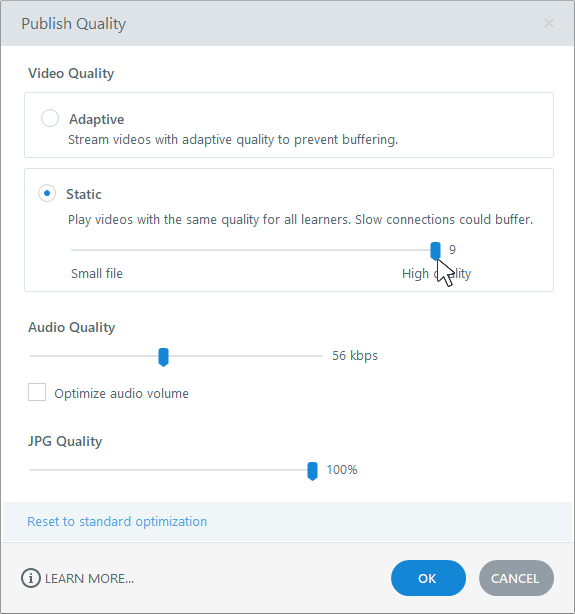
You can adjust the compression settings Storyline 360 uses for static videos and JPG images when you publish your course. Click the Quality property in the Publish window, choose the Static video quality setting, then drag the Static slider. For JPG images, drag the JPG Quality slider.
Note: Higher quality values result in larger file sizes, which could mean longer download times for learners with slow internet connections. Use the adaptive video quality instead to deliver video content to all learners, regardless of their internet speed.

Also, if you're using MP4 videos (created with baseline, main, or high profiles), you can turn off compression altogether for the highest quality. Select each video placeholder in your course, go to the Options tab on the ribbon, and change the Compression to None.
Tip: As of April 2022, we improved how Storyline 360 handles images during import and in the published output, resulting in crisper images.
Lock the Storyline 360 Player at Optimal Size
If you're using the classic player style, you can reduce the potential for blurry images by locking the player at optimal size, which is your slide size plus some additional width and height to accommodate the player frame. Here's how:
- Go to the Home tab on the ribbon and click Player.
- When the player properties appear, click Other on the ribbon.
- Set the Player size to Lock player at optimal size.
- Click OK to save your change.
The modern player style doesn't support locking the player at optimal size. However, you can set your course to open in a new window and resize the learner's browser to optimal size. Here's how:
- Go to the Home tab on the ribbon and click Player.
- When the player properties appear, click Other on the ribbon.
- Mark the box to Launch player in new window.
- Set the Browser size to Resize browser to optimal size.
- When you publish your course, give learners a link for the
launcher.htmlfile in your published output (rather than the defaultstory.htmlfile).


