


Storyline 360: Emphasis Animations
Article Last Updated
This article applies to:
Delight learners with emphasis animations—one of the top Storyline 360 feature requests—available as of January 2024. Captivating animations like pulsing and teetering set a more realistic scene and bring slide objects to life, taking your content to the next level to grab learners' attention.
- Add Emphasis Animations
- Adjust the Speed of an Emphasis Animation
- Choose Effect Options
- Delete Emphasis Animations
- Make Emphasis Animations Accessible
- Understand Compatibility
Add Emphasis Animations
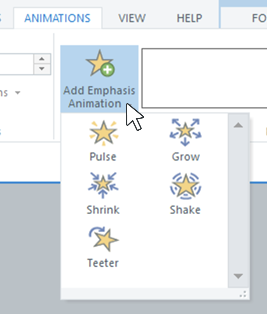
Here's how to add an emphasis animation to an object:
- Select the object and go to the Animations tab on the ribbon.
- Click the Add Emphasis Animation drop-down arrow, as shown below, and choose an animation from the gallery.
- Once you select the animation, Storyline 360 automatically creates an editable trigger that initiates the emphasis animation on the selected object when the learner clicks that object.
Tips:
- Each object in your course can have one entrance animation, one exit animation, multiple emphasis animations, and multiple motion path animations.
- Emphasis animations are supported only for shapes, images, buttons, characters, markers, text boxes, and videos.
- Here's a time-saver: Thanks to emphasis animations, you can now preview local JavaScript triggers—such as ones that retrieve or set the value of a Storyline 360 variable. If you're using complex JavaScript triggers, you'll still want to publish your course to a web server or LMS for proper testing.
Adjust the Speed of an Emphasis Animation
Emphasis animations default to a duration of 0.75 seconds. You can make them faster or slower by entering a time in the Duration field for the animation.
Choose Effect Options
You can also modify the intensity of emphasis animation effects with Effect Options.
|
Emphasis Animation |
Effect Options |
|
Pulse |
Choose the motion level: low, medium, or high. |
|
Shake |
Choose the motion level: low, medium, or high. |
|
Teeter |
Choose the motion level: low, medium, or high. You can also set the direction of the teeter animation from the Direction sub-menu. |
|
Grow |
Choose the grow amount: medium, large, larger, or restore the animation to its original size. You can also set the rate of change of the grow animation from the Easing sub-menu. |
|
Shrink |
Choose the shrink amount: medium, small, smaller, or restore the animation to its original size. You can also set the rate of change of the shrink animation from the Easing sub-menu. |
Pro Tip: Here's one way to use the grow and shrink emphasis animations together:
- Apply the grow animation to an object, keeping the default trigger that fires when the learner clicks that object (see above on how to add emphasis animations).
- Add the shrink animation to that object and change the default trigger to fire when the grow animation completes or when the timeline ends. Then, in the Effect Options drop-down arrow, choose Original Size.
Delete Emphasis Animations
To remove an emphasis animation from an object, select the animation from the gallery and click the trash icon on the ribbon.
Note: When you delete an emphasis animation, its emphasis trigger also gets removed—but not vice versa.
Make Emphasis Animations Accessible
Ensuring your animations are accessible to all learners—regardless of their ability—is critical. Here are some tips for designing accessible animations:
- Give learners the option to turn animations off. For example, you could use a true/false variable to track whether a learner wants to see animations. Then, depending on the learner's choice, a layer with animations or a different layer without animations would appear.
- Avoid unnecessary animations; don't depend on animations and color alone to convey information.
- Don't use animations that move the foreground and background at different speeds.
- When you do choose to use emphasis animations, you can use the Effect Options drop-down arrow to select a low level of motion for improved accessibility. Also, keep the duration of animations to less than five seconds.
Understand Compatibility
Emphasis animations are exclusive to 32-bit and 64-bit Storyline 360 as of January 2024. Project files with emphasis animations won't open in Storyline 3 or earlier versions of Storyline 360. To restore compatibility, remove the emphasis animations.